Tuesday, May 13, 2014

Regional SAQA exhibit at VisArts in Rockville, MD

The 2014 SAQA conference was held in Old Town Alexandria and was as energizing as the past 5 conferences. One of the breakout sessions was offered by Leslie Riley, who is a coach helping artists to grow their business. She had a lot of good tips. She talked about taking risks, and putting yourself out there. Leslie quoted Joseph Campbell "A door will appear where there was no door". A great attitude to have when we are facing challenges.

One of her admonitions was to "Take Action!" Leslie recommended that we take small steps consistently, working toward a goal, managing our time, staying focused, and being organized. These are all habits I aspire to gain!

Leslie was asked if she would organize a regional exhibit with other SAQA members, and although she felt she was very busy, she wanted to follow her own advice and step up for new challenges. She agreed to do it, and also made a quilt for the exhibit although she hadn't made one for almost 10 years. There is a great sense of accomplishment when the result is as concrete as an exhibit that shows great art, and is well attended.

After the conference in VA ended, I was able to visit the exhibit "Tarnish" in Rockville, MD at the Vis Arts Gallery. It's a lovely, open and well lit gallery on the second floor of the building.

The theme was "Tarnish", and as usual, a simple concept leaves a lot of possibilities for interpretation. The juror was Deidre Adams and I think she picked a very strong show with wonderful diversity in style, technique and subject matter. Deidre has a blog and has additional photo's and comments that may interest you. I've admired Deidre's work for a long time, and one of her works was included in the exhibit.

This is a detail from Deidre's artwork - just a teaser! If you'd like to see more, head on over to her blog or website to enjoy the color and textural quality of her work.


These are images showing a couple of walls. I don't think I could identify all of the artists, but there is a list of them on the VisArts site.


Seeing this exhibit, and the impressive quality of it made me think 2 things - I should help organize a regional visit, and I wish I lived in Maryland again so I could spend time with the talented artists there. Both Leslie and Deidre inspired me to take risks, jump in and get moving on my short and long term goals.

Friday, April 25, 2014

Art changing culture

I've been enjoying the blog posts from the National Museum of Women in the Arts. They have been engaging and thoughtful and show a real change in the museum's focus toward a more contemporary approach. The blog is called "Broad Strokes" and is well worth subscribing to - don't take my word for it - check it out here:
http://womeninthearts.wordpress.com/author/womeninthearts/

A recent post was about the newest project to try to change attitudes and heal people. Remember the AIDS quilt and how it made AIDS feel like an awful problem for all of us? And undoubtedly helped move many people to be more understanding and accepting of people who are gay.

This new project "The Monument Quilt" is focused on healing people who have been raped and/or abused. They are setting up workshops all around the U.S. where survivors of rape and abuse can come to make their own quilt squares. They will be displayed on the National Mall in Washington, DC, spelling out the words "No More". If you know of anyone who might find some healing in this project, please pass this on. It's a Kickstarter project, so you can donate to make it happen on their website:

The Monument Quilt


Peace!

Monday, March 10, 2014

Published in Fiber Arts Now

The Fiber In The Present Tense exhibit opened on Saturday, March 8 in New Bedford, MA at the Artworks Gallery with a couple of rooms full of artists and their friends and family. It was a very nice reception. My husband, brother and sister in law were there, giving me the adulation only family members can give! It was great to have them there. The exhibit is up until March 29 if you can make it to the gallery.
The photo below shows the title of the exhibit and a nice variety of work:

I'm sorry I didn't make note of the title and artist on each of these works. I know the stitched figure (3rd from left) is by Jeanne Sisson, and the quilt on the right is by Rosemary Hoffenberg.
 

This little nest is called"The Beginning for the 1%" and was made by Beverly Gomes. It's a little fetus in the womb with a gold, beaded crown, surrounded by peacock feathers! I love it.
The exhibit was very diverse, with all kinds of fiber art. It is a really interesting look at contemporary fiber. The "Fiber Art Now" magazine had a good article on the exhbit and I was very pleased to see my work featured on the title page. The photo of the page will give you a good idea of how diverse the exhibit is - art quilt by me, wire construction by Ellen Wieske, and a wonderful fantasy-type basket made of paper by Jeanne Flanagan.
Spring 2014 issue of Fiber Art Now pages 14-15
Here's the cover of the magazine in case you want to look for it:

Friday, January 10, 2014

My work made it into the Quilters Newsletter Magazine!

A friend wrote to tell me she saw one of my art quilts on the website for the February online issue of Quilters Newsletter. I don't have a copy yet, but assume that it is also in the print edition. What a lovely surprise!

Going In Circles  32" wide x 38" high 


Link to Quilters Newsletter magazine

The quilt is traveling around the country with the "Hands All Around" exhibit, after being exhibited at the International Quilt Festival in Houston. It's one of my favorite works, so I feel like a proud parent whose child is doing very well. The Quilt Festival shows in Pittsburgh, Chicago and Portland will include the exhibit.

The quilt has already been part of exhibits at Visions Museum in San Diego, CA and at the Schweinfurth Art Museum in Auburn, NY, as well as the New Marlborough, MA exhibit of Fabulous Fabric and Fiber. It's getting around almost as much as me!


Saturday, January 4, 2014

Working small

It's a new year, and time to think about what I will work on this year. I see it as an opportunity to reassess where I've been, and what I've been doing. And, to spur some new ideas in the studio! I'm still making up a list of shows to enter, and other goals for the year.

SAQA is doing another trunk show in 2014 and requesting pieces that are 10" high x 7" wide. As I've said before, it's hard to work that small, but good practice. Working small means the composition better be very clean, and the details interesting.

I started by pulling a sketch out of a sketchbook to see if I could develop it into something pleasing.
The Sketch:

I liked the spirals running into each other and their interplay. Unfortunately, I didn't think through how I would actually do it in fabric. (Yes, I have been working with fabric for years, but sometimes I forget how hard it is to make it do things that could be done with paint.  Duh). I had a couple of pieces of newly dyed fabric that worked well together, so I cut out a background, fused another fabric and then cut some thin strips of the fused fabric on the bias.

In the past, I've fused curving lines with no trouble, but working in such a small frame was challenging. After fusing the spirals onto the background, I realized I would need to hold the fused pieces down with stitching, so the edges were satin stitched.

You can't tell from this little image, but the satin stitching looks awful. And where the spirals meet, it was very challenging to maintain the tension between the lines and still keep the stitching looking somewhat consistent. I also used the piece to practice some couching, which didn't work well. It needed an interfacing.

Back to the cutting table!

I decided to change the spirals from butting into each other, and instead, I put them in a vertical orientation. I also thought the cross like lines in the background of the first piece were distracting. Starting over again with a similar background and fused fabric, I ended up with the design below. Instead of trying to satin stitch it, a piece of tulle was placed over it, and then free motion machine stitched. It seemed to be getting a nice rich feeling to it so I kept threading new colors in the machine, and adding to the spirals.

When the piece seemed finished, I read the instructions and saw that the edges had to be finished. So a border was cut out of the fused fabric and after fusing it all the way around, it was stitched down.
I like it. What do you think?

Sunday, December 22, 2013

Surface Design encyclopedia?

My friend Cheryl Rezendes has written a fantastic book that seems to cover every possible surface design technique. I've bought a couple for gifts, and wanted to recommend it as a wonderful resource for any artist friends who love to have new techniques at their finger tips, or a good place to review methods.
It's well written, and there are tons of photo's and diagrams. I'm not just saying this because she's my friend! Lyric Kinard also gave "Fabric Surface Design" a great review on her blog.

Here's the link to Cheryl's Etsy shop. Cherscapes Etsy shop
You can look through the chapters and get a good idea of how beautifully the book was done. Kudo's to Storey Publishing for seeing a wonderful opportunity in Cheryl's artistic background and down to earth style.

I hope you have a wonderful holiday, whatever you may celebrate!

Tuesday, October 29, 2013

One way to hang a quilt


I recently had a two person show and needed to be able to hang the quilts fairly quickly. The gallery was okay with putting nails in the wall, so I used the same system I use at home.

I like to use Levolor adjustable width pocket rods. They are almost flat and have a hole in each end where the nails can go, and they are adjustable. They come in two different lengths so I keep some on hand for different quilts. I buy them at Lowe's, but I would imagine they are available where ever Levolor curtain rods are sold.

This is the label for the shorter length rod:

The rod slips easily into the sleeve at the back of the quilt:
I put tape on to keep the rod the size it needs to be for that quilt. I can always remove the tape and use it for another quilt in the future. Not sure if you'll be able to see the tape on the rod, but you get the idea...
After holding the quilt up on the wall and deciding on the height and placement, I make pencil marks for the holes. Then I hold the rod up and place a level tool on the top rim. Once I have it leveled, I double check the pencil marks, and put nails in those marks.
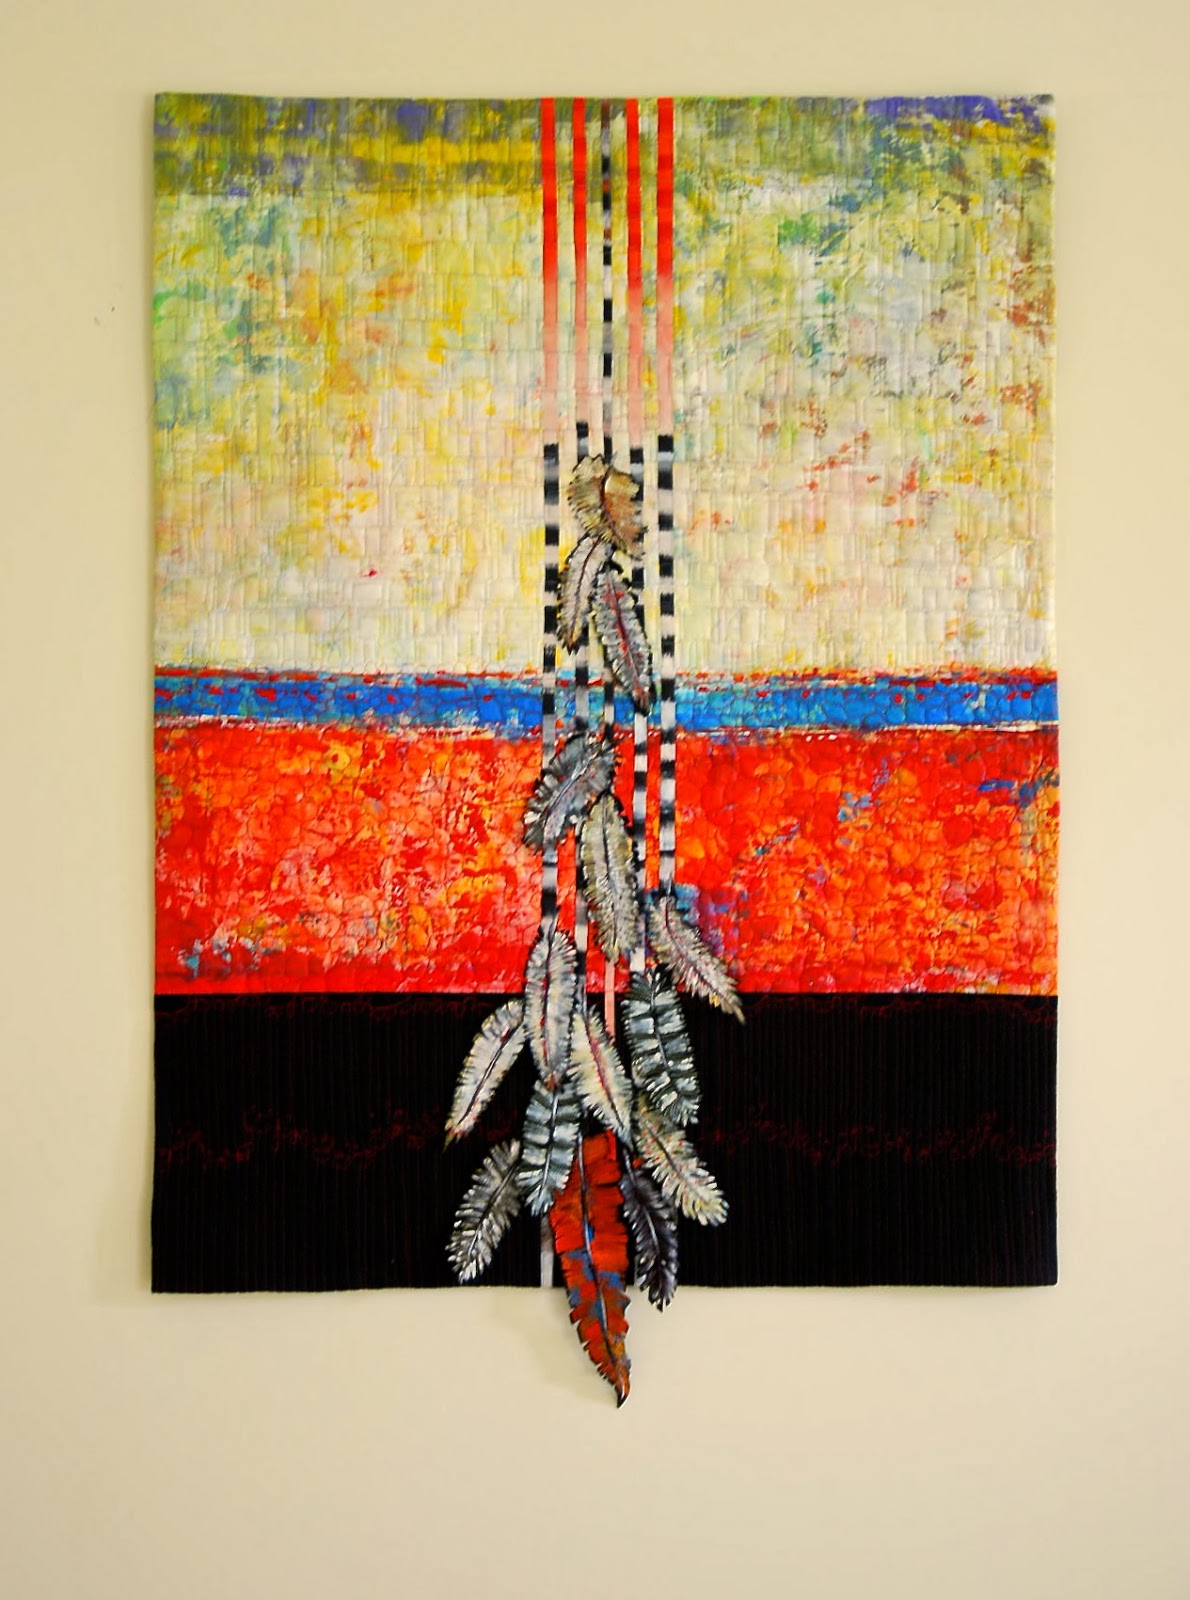
Now I can slide the rod into the quilt and place the nails in the holes and admire my work - or in this case the work of Susan Szajer! I bought this quilt after seeing it in Santa Fe and falling in love with it. I'm planning on painting the wall a little deeper color to show off the quilt, and putting a small chest of drawers under it. Susan does beautiful work - she paints and quilts. I'm so pleased to be able to see this quilt every day.


The feathers on the quilt are 3-D and have a wonderful textural quality to them. Please visit Susan's website to see more of her lovely work: Susan Szajer website and blog.


I hope this was helpful for you. If there are any questions, please put them in the comment section and I'll try to answer them asap!